Making lanterns from recycled materials not only helps protect the environment, reduces waste, but also stimulates children's creativity. It would be great if we could reuse materials that seem to no longer be needed such as plastic bottles, paper cups, straws... wouldn't it?
How to make animal lanterns from plastic bottles
Materials need to be prepared
- 1 empty plastic bottle
- Quality and safe paints
- Coloring brush
- Ruler, black marker
- Wooden stick to make the lamp handle (can use old chopsticks instead) and parachute string to hang the lamp)
- Scissors, paper knife
- Hot stick glue
- LED string lights or small flashlights
- 1 sheet of colored paper (you can choose pink if making a pig image)

Ingredients need to be prepared
Implementation steps
Step 1: Use a ruler and pen to draw a rectangle on the bottle body. You help your child use a paper knife to cut out the rectangle he just drew to clean the plastic bottle thoroughly. Then paint the entire bottle with the color of the animal your child likes. For example: brown bears. White rabbit, pink pig...

Cut a hollow rectangular box to clean the vase thoroughly
Step 2: Shape other parts of the animal. If you make a pig-shaped lantern from recycled materials , you can cut 2 triangles to make the pig's ears, 1 oval to make the pig's nose, and a spiral to make the tail. Similarly, we can make bear ears using ⅔ of a circle or long bunny ears.
Step 3: Draw the position of the pig's nose, ears and tail with a black marker. You should let your child use the marker to draw and outline the parts themselves, thereby stimulating their dexterity and creativity. Then use candle glue to stick it to the body of the bottle

At this step, the shape of the pig lantern is completed
Step 4: Make 2 holes in the middle of the upper body and thread the string through, tying the string to the end of the stick
Step 5: Attach a small flashlight or put the LED light string inside.

Attach the light and your baby will immediately have a lovely lantern
So we have completed how to make brightly lit lanterns from recycled materials . Your baby will stand out when using this lamp to carry the Mid-Autumn Festival lights.
How to make lanterns with recycled materials: paper
Make lanterns from colored paper
You need to prepare assorted colored paper, ruler, glue, transparent tape and string. Follow these steps to have a lovely lamp right away
- Fold a rectangular piece of cardboard in half.
- Use a pen and ruler to draw parallel lines, 3cm apart on the paper. You need to leave about 2cm at each edge of the paper.
- Use scissors to cut the drawn lines.
- Roll the two ends of colored paper and glue them with glue.
- Punch two holes at both ends of the paper near the top and bottom edges of the lantern.
- Insert a string to make a handle for your baby to carry.
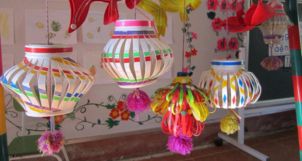
Paper lanterns with easy-to-find ingredients and simple making methods
Parents can use pens or other colored paper to further decorate the lantern. Cutting more flowers, leaves, and patterns to stick on the outside is also a good idea.
How to make lanterns from paper cups
You should choose 2 thick paper cups for children to play with for a long time, prepare extra plastic sticks and a piece of string to make lanterns from recycled materials. Don't forget to prepare extra tape, scissors and tools for coloring and drawing! You make lanterns for children as follows:
-
Cut equal vertical strips on the body of the cup starting from the rim of the cup.

-
Cut off the round edge on the rim of the cup and bevel the sharp part away.

-
Use another cup, take the bottom of the cup and a piece of the top of the cup. Cut the cup body lengthwise as in step 1.
-
Glue the bottom of the cup to the cut paper cup with glue or transparent tape.

-
Poke a hole in the center of the bottom of the cup, thread the string through and tie it tightly to make a string to hang the lamp.
-
Color around the light strips to make the lamp more eye-catching.

-
Cut tassels from red cardboard, can be glued or tied with thread, then attached to the bottom of the cup for decoration.

The tassel will make the lantern more eye-catching
How to make military lanterns using straws
If your house has used straws, don't rush to throw them away. Let's start making lanterns using recycled materials such as plastic straws. The ingredients needed to prepare are extremely simple, just colorful plastic straws, candle glue, scissors, parachute cord and small adhesive tape are enough.
Doing:
Step 1: Glue 10 straws together with candle glue, making 6 rectangles. You can also adjust the size depending on the number of straws your home has.

Tape the pieces together with tape
Step 2: Take 4 straws of the same color and stick them to the 4 sides of each rectangle.
Glue the tubes together with hot glue
Step 3: Glue 6 rectangles together using the long edge to form a hexagon.

Assemble the rectangles together
Step 4: Use 3 straws and stick them to the 3 staggered edges above the lamp frame, grab the ends of the tubes together and use a glue gun to stick them tightly.
Step 5: Use parachute string to tie the tops of the 3 pipe ends in step 4.

The military lantern from recycled materials has been completed
Step 6: Decorate according to your baby's preferences to make the lights more eye-catching.
Note: With this method of making lanterns from recycled materials, the finished product can only be used for display. Parents should limit children playing with candles to avoid the plastic melting and burning their children.
So we have learned some ways to make lanterns from recycled materials . Children can use these products to show off to their friends during craft class in class. Parents should tell their children about the effects of lanterns during the Mid-Autumn Festival so that they can better understand the "Tet Reunion" day and be even more excited.


